by Amy Konecny
on August 10, 2015
with 0 comments
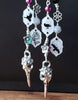
Playing with Cement is so much fun!
I love using Cement for craft projects. It's versatile, cheep, and best of all easy. In fact it's so easy you'll wonder why you have not given it a try until now.
Today I'm going to show you how to make these cool tea-light holders.

Materials


1) Portland Cement: There are quite a few differences between cement and concrete. If you want to know them all I would take a visit to Americas Cement Manufacturers Associations website. However the big point you need to know for doing this project is that it dose not have rocks in it. Also the bags come in 42 pounds and 94 pounds so you will want help moving them. Don't hurt yourself.
2) A disposable container to mix the cement in. I have two types shown in the picture above. The clear plastic container can be reused. These are for smaller batches if you want to make a larger batch a larger container will be necessary. I got mine at a yard sale for 25 cents for the clear one and 60 cents for the 4 paper buckets.
3) Soft plastic or silicone molds, 2 sizes. You can use a hard plastic or metal mold, it's just more work and they might get stuck to the cement so you'll have to brake it to release it. The Larger size is for the main shape and the smaller is to make the well the candle sits in. I used some things I picked up at the Dollar Tree.
4) Something to stir with. I am using a paint stick I picked up at my local hardware store, but you can use just about anything even you hands. If you choose to use your hands please ware gloves. It's not because cement is toxic or anything like that, but it will suck the moisture out of your hands and leave them a total mess. I learned this one the hard way.
5) Sand Paper. I used 100 grit sand paper. I found a container of 20 sheets at the Dollar Tree. These will be used up so no need to use the expensive kind.
6) Water. You'll be adding this to the mix to make the Cement, in the sanding process, and for washing up.
7) Paint and Polyurethane. This last one is optional. You might want to leave it natural or you might want to paint the whole thing.
Once you have gathered all your ingredients it's time to begin.
1) Mix The Cement. Mixing cement is a lot like mixing cake batter, I know this is only helpful if you bake. Let me explain in detail. First put water in to your mixing bowl, quarter full or less. Then slowly mix in the cement till you get the consistency you want. This means put a little bit in and stir then put in a little bit more and stir some more... repeat till your happy with the result. Do Not just dump a large amount of cement into the bowl unless you want to make a large mess. You will end up with some parts well mixed, some parts still dry, part that is still mostly water, and splatters all over the place. Well that could be fun to, but not productive.
A couple of things you need to know when mixing cement. Portland Cement dose not dry it cures so it can be completely covered in water and still harden. So once you start with this project work until you are done. The other thing to know is the more water to cement you have the weaker your end product will be so make it as thick as you can for what you are working on.
This is what a thin, but still usable mix will look like. It's about as thick as cake batter. It pours smoothly and flattens out immediately.

This is a thick mix, it has the consistency of thick brownie mix. It will pour well, but you will need to use the scraper or spoon to help it along. In baking terms it would be a the soft picks stage. (It can actually be made thicker than this, but it becomes difficult to use for small projects)

2) Pour the Cement into your mold. Don't fill the mold completely you need to leave expansion room for when you put in the second mold (the one that creates the well). Just eyeball it you can always use a spoon to remove excess if you put to much in.
3) Gently Tap your mold on a hard surface for around a minute. You do this for two reasons. The First reason in to make sure the cement completely settles into all the nooks and cranes so you have a smooth and whole piece. The Second reason is removing the air bubbles. Air bubbles unless you have a lot of them will not harm your project, but they can be unsightly. I don't mind a few so I don't try to get rid of all of them, but the smoother you want your surface / sides / bottom to be the more you will want to work on this. If you get any bulges at the top that will not pop just from tapping try blowing on it. This usually works well.
4) Insert the second mold. If like me you are using a much smaller second mold then just push in into the cement until just about a cementer is left sticking out of the cement. At this point mine kept on popping back up so I put some rocks in it to keep that from happening. If you are using a larger second mold just push it in until your happy.
Two things to remember at this time. If the lip of your second mold gets covered in cement then it will make it difficult to remove, you will most likely need to chip away at the cement and possibly brake the mold to remove it, hence leaving a centimeter of space around the top. If you are using a second mold that is close to the same size as the first or close to as deep. Remember that the thinner the thickness of the cement is the less strength it will have. It's fine if you want something delicate looking, just remember that it will be delicate in reality as well. Plus if one area is significantly thinner than the others that will be it's weak spot and ware it will brake.
5) Leave it alone. If it's a small project like this one then you only need to let it dry/cure for a day. I think I only left this one alone for 20 hours.
This is what it looked like the next day. Note: I broke off the handle of a plastic measuring cup because the handle was to long and would have made the bottom of the well not even. However this could lead to harm to you or me if the plastic should hit exposed skin (I wore safety goggles so my eyes where safe) during the removal proses and you or I could later be cut on the sharp edges. If you are under 18 please don't do this. If you are over 18 well your an adult and if you want to risk life and limb that's your choice. Just don't say I did not warn you of the risks.

6) Remove the cement from both molds. Because the large mold was soft plastic I just turned it upside down and it slid right out. However the inside mold was made from hard plastic so I had to use some pliers to put it out. I was impatient (the first one I Attacked after only 12 hours) I cause a small amount of to the piece when removing the small mold, but the other 2 came out just fine (I waited till later that day).

7) Sanding the top. Once it is out of the molds you will need to sand the top. You'll notice it has sharp edges and scaling (more so in the picture of it still in the mold. I started sanding before I remembered to take a picture. To remove the scaling and ruff edges you will need to sand it down. Sanding is easy, but a little messy. To make it less messy get your piece wet (this gets rid of the dust problem, witch is really bad for you). Then just take some sandpaper (I use 100 grit) to it and sand in a circular motion. You will want to rinse it off several times to see how the progress is going. You don't need to use much presser and it will only take a minute or two. I do not recommend using an electric sander. Mostly because there is water involved and water plus electricity could make fore a very hair raising day.

I'm showing this in my kitchen sink because I was taking pictuers, but you really will want to do this outside with your garden hose. The grit that is produced will not be good for your drainage system.
8) Paint and Poly what ever part you want to. Once you are done with the first 7 steps you might deiced that Wow this is perfect the way it is. If that is the case then Yea! your done. However I took it one step further and painted and then polyurethaned the inside of the well because I thought it would look cool. One thing you need to know about painting cement is that it will suck up the paint really fast. This means you will need to do several coats, but they will dry quickly.
Tada! Your Done


You will notice that they all came out different colors. That is because they where all different batches of cement with differing amounts of water. If you make yours all from one batch they will be the same color. Also cement is not technically completely dry/cured for 30 days. Though the only practical difference is the color will change slightly. If you where poring a driveway you could drive on it after only 7 days.


by Amy Konecny
on August 06, 2015
with 0 comments
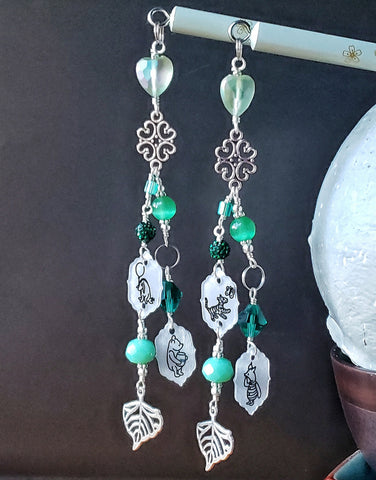
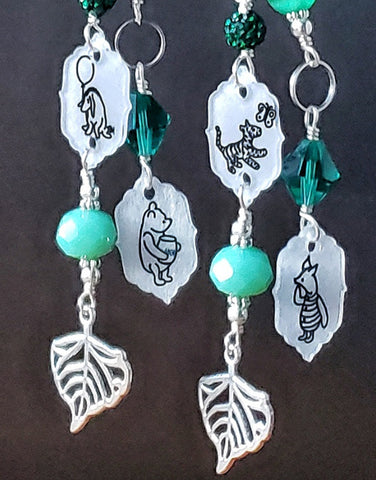
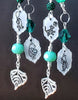
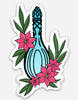
Free! Eternal Summer Inspired Earrings

With Summer officially coming to a close and only a few weeks or months (if you live in the south like me) left to go swimming I thought I would bring you some fun swimming earrings.
Admittedly this is not obvious, unless your a complete Otaku (look left, look right, look in mirror, oh there's one). But they are perfect for your last great hurrah at the pool. These earrings are inspired by the Anime "Free! - Iwatobi Swim Club" (the manga has a different name) or as one of my friends calls it "That swimming manga". It's all about a group of boys that are completely obsessed with swimming. I watched the anime because my Father went to collage on a swimming diving scholarship (go Dad) so I was moved to watch it and I enjoyed it quite a bit, because I like a nice and sweet story.
The Free! stands for Freestyle a type of swimming and the aqua blue bead at top is to represent the water simple, blue, different.
Ok now it's time for a bad joke...
What Dose Haruka order at McDonald's?
Water, because it's free.
Your welcome.


by Amy Konecny
on August 03, 2015
with 0 comments
It's Raining Money
Just in time for going back to school or updating your fall wardrobe.

Yes you read that right I'm giving away money this month. I'm sure your "asking what's the catch?" and that is perfectly reasonable. So here's all the info you could want.
First of all the e-gift card/coupon code is only good for my website. I know you wanted it to go towards a boob job, but I'm greedy so it all stays with me.
Second it's actually a coupon code not a real gift card so it dose expire. You'll have till the end of October to use it so that gives you 2-3 months witch is not bad. Plus frankly if you had it longer than that you would probably forget you had it and it would just go to waist so really I'm doing you a favor... no, no really it's all for your own good. See I'm a caring wonderful person... honest.
Third each item you buy has to be at least $8.00 or more. I know it would be nice to buy 3 extra-hands (witch are $3.00 each) then get a coupon code for $10, but well once again I'm greedy and I want your money. So you need to spend at least $24 to get the $10's. Still it's a really good deal, most places make you spend $100 to get $10.00 off. If I was you I would go crazy shopping right now. Maybe you need a Funky Bracelet or new earrings. What ever it is that makes your heart happy (jewelry wise), I hope that I can fulfill it.
Ok Lets recap: Buy 3 items and get $10.00 what could be better.


by Amy Konecny
on July 30, 2015
with 0 comments
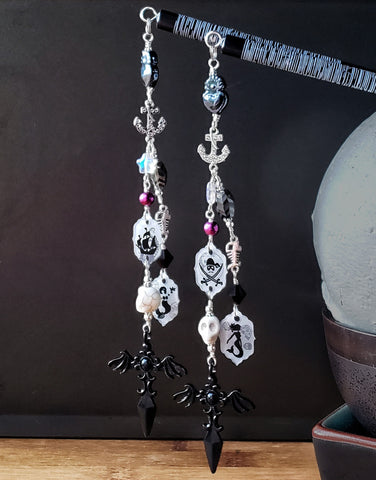
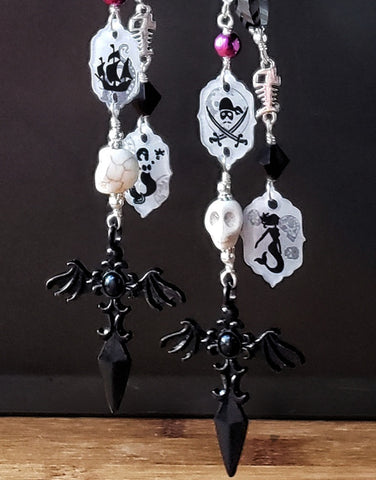
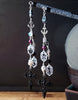
Getting Angry, Anime Style

There is a lot to like about anime and one of the things that tickles my funny bone the most is always being able to tell when someone is truly ticked off, the more angry marks there are on them or around them the more unhappy they are (yes I know I'm not right in the head). But really wouldn't be great if you could express that in real life? Even if you are not into anime some days you just want the world to know to go away I'm not in a happy mood. Because of that I just had to make these earrings, If your equally wrong in the head you will just love them. I will say that most jobs and schools would not let you ware these earrings (because they are boring), but who cares about them they don't have to rule your every waking moment.
What I'm saying is Buy these earrings I know you want to.


by Amy Konecny
on July 27, 2015
with 0 comments
Its interview time again and this time you get to meet my friend Shane with Shane's Forever Files.
Shane's Forever Files is a family-owned company out of Lebanon, PA. They sell those really cool glass nail files. They hand paint them so they are really pretty.
Because we Crafters can never stop trying new things he also hand makes really cool wood cutting boards and rolling pins.

Like the last interview I could go on about how cool Shane is and his products, but I want to get to the fun stuff so on with the interview. Oh and just as a warring we held this interview by text and we both used text-to-speak so I am not giving you a direct transcripts since some of the things that came across I'm sure where not what was meant (though I could be wrong).
Okay are you ready for the hard hitting questions?
Hell Yes!
Great!
1) What is your favorite color?
Red I guess. Here I thought the question was going to be a bit more risque. That was a lot of build up for a color question.
Haha. No it will stay PG-13.
2) What was your favorite childhood injure?
Let's see one time I ran into the back of a wagon that was hauling hay with my bike and could open both of my knees. Then there was the time I was playing football in the house and broke my wrist. Or maybe the time I was building a house and a big block or wood fell from 2 stories up and hit me on the head, that one almost killed me. Another time I was working in a dungeon and got caught on a jackhammer and was pinned against a wall... almost lost something very important that time.
What! What? You where working in a Dungeon?
My parents house had a basement below the basement made of solid concrete so we called it the dungeon or vault.
Oh okay that is so much better than what I was thinking. Witch one of those was your favorite injury?
I think Playing football in the house.
The third question is going to be semi related to the woodworking part of your business. Are you Ready?
Go ahead
3) How much wood would a woodchuck chuck if a woodchuck could chuck wood?
Really???
Yes really (trying really hard not to laugh at my friend at this point). You've heard this question your whole life surely you have an answer for it by now.
As much as a woodchuck wants. And no one in their right mind or otherwise has ever asked me that question.
Glad I could be the first.
4) Have you ever jumped out of an airplane? If not Why?
Hell no I'm not jumping out of a perfectly good airplane with a shoot that might or might not open.
5) If you where to be hit in the face by pin, what kind of pie would you like it to be?
Cherry or Apple No no make that Peach Pie...Yum.
6) Who would win in a fight, Astronaut or Caveman?
Caveman
7) What is your least favorite mode of transportation?
Bicycle
Are you not good at it or dose it just hurt your bum? Oh I know you silly, you don't think you look good in a bright pink helmet.
It hurts my legs and my butt and I love to wear a pink helmet
8) If you were given the opportunity to have a superpower, but you had to choose between being able to travel into the past or seeing the future, witch if either would you choose and why?
I would see into the future because I want to win some money at something, so I can put a new roof on the woodshop and take a vacation.
9) What is your favorite knock knock joke?
I don't have one
Sigh, I don't get to learn a new joke. Oh well
10) If you owned a CB radio what would your "Handle" be?
WOOD GOD!
Shane thank you for being a good sport and answering my silly question. Check back on the last Monday of each month for a new and silly interview.


by Amy Konecny
on July 23, 2015
with 0 comments
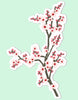
Welcome to Hogwarts School of Witchcraft and Wizardry
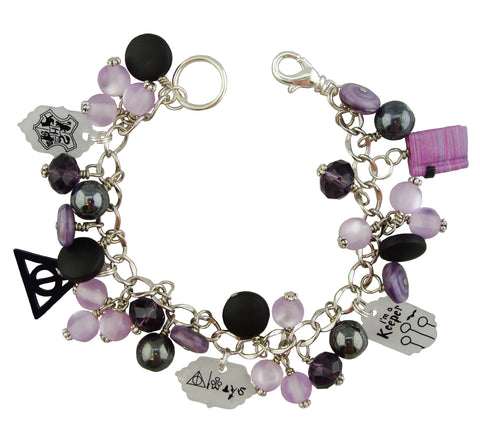
New this week is a fun Harry Potter Inspired Bracelet in honer of the School for Witchcraft and Wizardry.
Instead of choosing a house how about celebrating the whole school? I did this bracelet up all in purples and black because thous are the colors that come to my mind when I think about magic (and because purple is not a house color). The charms are meant to represent the things that all houses and wizards can get behind.
by Amy Konecny
on July 20, 2015
with 0 comments
Only 2 weeks left on this months sale!

For the Month of July get 10% off all Funky Bracelets with the Coupon Code: SoFunky capitalization dose count so I recommend you just cut and past (it just makes life so much easier).
Below are a few of my favorite Funky Bracelets....


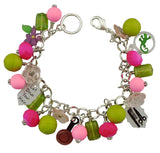
Actually that last statement is a little bit of a lie or maybe not fully truthful... since all the Funky Bracelets that make it onto my web-sight are some of my favorites.


by Amy Konecny
on July 16, 2015
with 0 comments
The Supreme Court delivered a historic victory for human rights on June 20, 2015, in a 5 to 4 ruling: The Constitution requires that same-sex couples be allowed to marry no matter where they live.
In honer of this I have made 2 new buttons, but I did it Anime Style!


So Weather you are in a "Regular", Yaoi, or a Yuri relationship, be joyous in your love. Because All Love is Beautiful.
Of course you don't have to be in any kind of relationship, you might just be a fan of Yaoi or Yuri Anime / Manga and want to let the world know what kind of Otaku you are and that is just wonderful too.
So to all my friends and fellow humans out there that are planing a celebration I just want to say one thing.... I make bridle Jewelry : )
Okay, okay let's be serious for one moment. Congratulations
by Amy Konecny
on July 13, 2015
with 1 comments
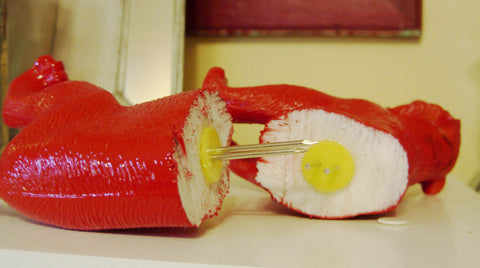
It's Time to get Corny with Fancy Corn On the Cob Holders!

I have seen these fancyfied Corn Holders all over Pinterest. ... Okay 2 or 3 places, that counts as all over the place right? And I wondered how hard it would be to make one.
Here are my step by step instructions so you can make one too.

Materials you will Need
1) Rubber animal or dinosaur. It needs to be able to stand on it's own, 4 feet/paws are required. Also it cant' be a hard plastic figure it needs to be a rubber one that is still flexible and solid all the way through. I picked mine up at a yard-sale for 25 cents... My friend Viv recommends a dog for those of you who like corn-dogs.
2) Hacksaw. To cut it in half.
3) 2 standard corn on the cob holders. You know the kind that everyone sells super cheep that look like corn. You might have some at home, I did and just used 2 of those.
4) A drill with a large drill bit. I used a 1/4 inch drill bit, but if your corn on the cob holders are a different size you will need to adjust for that.
5) Glue. I recommend E6000, but 2 part epoxy would also work. It needs to be strong enough to withstand getting yanked on offend (when your removing the holders from the corpses of your defeated foe... you know the corn)
6) Pen. I used a Sharpie because it will wright on almost anything, but what ever is at hand will work.
7) Foam Sanding Block.
Optional Materials
1) A piece of Ribbon. I'll explain later, but it will make your life easier
2). Paint. This is not necessary you might like your animal tout naturel. Since I got mine at a yard-sale it had been loved and needed a paint job. You can use a variety of paints.
3) Polyurethane. If you use wall paint (love those samples) or craft paint you will also need to Polyurethane your piece.
4) Paint Brush. If you paint you'll need a few brushes, use what makes you happy.
Now that you have your materials Lets Get Started.
1) Clean your animal. Soap and water is fine. I'm going to refer to the animal as a Tiger from here on out.

2) Tie a ribbon around the center of the Tiger. You could use a measuring tape and make dots then connect them, but with an oddly shaped item like this it's so much easier to tie a ribbon around it and use that as your guide.

3) Draw your cut line. Just use the ribbon as a guide for were to draw your line. so easy this way.

4) Cut your Tiger in half. Ooh it's the saw the lady in half magic trick... done badly. Okay maybe not. Use your hacksaw and just follow your line. It dose not requite any real pressure to cut the rubber in half. Just be very careful to stay strait on your line. I had to stop part way though (family can really cut into crafting time) so you'll notice a stop/start line. Oh well no worrys.

5) Sand the inside. Your just trying to get the fuss off so you don't need to go crazy a simple foam sanding block will work just fine.

6) Make a mark in the center. This is were you will drill your hole for the prongs. You could measure it out carefully if you want to, I just eyeballed it. Either way is fine, but you will want a guide dot since It's hard to get an accurate reading when you have the drill in your hand.

7) Drill your hole. You will want a hole that is just smaller than your corn holders so it's a tight fit. Take this step slowly. For safety reasons you should put your Tiger in a clamp so you don't drill your hand. I'm an adult so I chose to take the risk and held my tiger by hand, I don't recommend this approach, but if your all grown up just make the best decision for you. If your are not yet legal or you are not used to using a drill then you definitely will need to use a clamp. Tips for drilling: Don't just try to make your hole all in one go. Drill down just a little bit then pull the drill out, repeat this until you have your desired depth. I recommend about 1/4 inch deeper than your corn holders. You do this for several reasons. 1) So you don't damage the motor of your drill by forcing it. 2) So you don't melt the rubber, that would just make a huge mess. 3) So you can more accurately gauge how deep your hole is and if it's going in strait. If you drill sideways or clear through the tiger then you will need to patch it or start all over, both are just a pain in the behind.
8) Paint your Tiger. This is an optional step. If you want to paint it you will need to make sure that the paint you use is food safe and that your tiger is completely dry before using. Most paint you will need to add a coat or 3 of polyurethane. I use the same kind of polyurethane that is used for floors and furniture. This means that you cant' cook with the item, have wet foods served in it, or put it though the dishwasher, but since they are corn holders you would not be doing any of this so it's not a big deal... or you can play it safe and just not paint it. Also it will take 30 days for the polyurethane to completely cure/dry. I would recommend waiting the full 30 days before use just to be on the safe side. I however used a spray paint, because I'm lazy and like instant gratification... plus I got the can on sale for only $2.50, what can I say I'm also cheep. The spray paint I used is a specialty enamel that is used for engines. It's a little tricky to use, but it is gloss, I did not need to prime, and is safe to use after only 21 days. I used less than 1/2 of the can so I could have made a matching pair, if I had found another rubber animal at the yard sales. You'll notice in the picture below that I did not put paint on the part of the tiger that will be touching the food.
9) Glue in your Prongs. Okay you where not impatient and waited til your tiger was safe to tough after painting it or you thought to heck with paint I like it just the way it is. Now it's time to glue in your old boring corn holders to create your prongs. I use E6000, but you could use 2 part epoxy if you want. Put just a dab on the end of your corn holders, more than a dab and you will end up with a big mess when the excess is pushed out the end. Line your corn holders up into the hole and push them in. Be careful the prongs are sharp. I recommend just getting them started by hand then using a scrap piece of wood and holding the body of the tiger not the holders. Push the corn holders full into the holes. You want this to be a tight fit so your holders don't get pulled out when you are removing them from the corn. Once the holders are in place wipe off the excess glue that has spilled out around the edges and let them dry fully. E6000 takes between 24-72 hours to fully dry, I always give it the full 3 days just to be safe. If you use something else just follow the instructions.
TADA! You Now Have a Super Fancy Set of Corn on the Cob Holders.

Okay I admit it this last picture I made up so it would be easy to Pin onto Pinterest or Post onto Facebook,
This project not including drying time took me about 3 hours and around $3.00 to make, yea! yard-sales.


by Amy Konecny
on July 09, 2015
with 0 comments
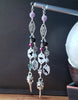
Aqua Sea Bracelet

Sand, Surf, and Sea is what springs to my mind when I think of summer. So when I was putting together a bracelet to add during the summer I had to go with that theme. I'm branching out a little from the norm for an Adjustable Bracelet and going closer to what an Art Bracelet looks like, but since I'm not putting any Art Bracelets up on the website for the simple reason that they are all one of a kind and I'm to lazy to take the time to clean up a picture for a one of a kind I split the difference and just made a fancier Adjustable Bracelet. This bracelet is A-symmetrical has a very large aqua blue bead in the center (about an inch long) 3 other blue beads in varying hues of blue, size and shape and a 1/2" square pewter bead with a flower pattern in the center. It also has a oval silver pate ring with a pewter shell charm hanging form it. It just makes me thing about running in the surf on a fine summer morning.